Showing posts with label studio. Show all posts

Sunday, January 17, 2016

Collaborating with Remote Artists

In today's world of bedroom studios and global collaboration, it's not uncommon to find musicians working with friends who are based in other towns or cities, or even in distant countries.

If you're a producer who has a friend in another location, and you'd like them to record some instrument or vocal tracks for one of your projects, the process is not that difficult.  However, it can be intimidating for a musician who has never tried it before.  This video should help.

In the video, I've tried to explain how a musician with a basic (but good quality) portable audio recorder can lay down some tracks for a producer, check on a laptop that the recording levels were appropriate (using free software called Audacity), and then share the audio files with a producer using Dropbox or a similar service.

The target audience for this video is producers who need to coach musicians through the process of creating and sharing such a recording, and for musicians who want to record their instrumental or vocal performances to be used in professional-sounding music.  Total run-time on the video is about forty minutes.


I'm Jonathan Clark, known online as DJ Bolivia.  To see the rest of the tutorials in my Audio Recording series, visit:


Thanks so much for visit, and for your support!  I really appreciate the fan base that I've been able to build up over the years.

Also, if you want to visit any of my other sites, here are a few links:
    YouTube:  youtube.com/djbolivia
    SoundCloud:  soundcloud.com/djbolivia
    Blogger:  djbolivia.blogspot.com
    Main Site:  www.djbolivia.ca

Sunday, January 10, 2016

Detailed Clickable Index for Jamstix Drum Software Tutorials

About a year ago, I put together a series of four videos teaching people the basics and some moderately in-depth tricks about using the Jamstix drum production software, produced by Rayzoon. I had a request in the Jamstix forums to create a clickable index, so I went through the four videos this evening and created an index.

If you're looking for all of the Jamstix videos and my notes, visit:  djbolivia.ca/jamstix

 
Part 1 of 4 - Jamstix, an Easy Way to Create Drum Tracks

00:00 - Introduction to myself and to my tutorial channel.
02:45 - Who is Jamstix for? What does it do?
10:38 - A simple demo, and a basic sample song.
14:57 - Intended uses. Why use Jamstix instead of a different drum production package?
21:09 - Slightly technical stuff, plus DAW's and plug-ins.
24:10 - How it works. General concepts, the brain, drum modules, more DAW stuff.
34:25 - Controlling the brain. And overview of styles and drummers.
39:46 - Understanding songs, parts, and bars.
42:58 - How does Jamstix compose? The groove layer, the aspect layer, and the fill layer.
50:31 - Three ways to approach composition.
52:38 - A quick overview of the Jamstix User Interface, plus a basic screen tour.


Part 2 of 4 - Covering All the Basic Operations

00:00 - Introduction, topics in this part of the series.
02:41 - A few quick notes about Cubase.
07:23 - Using the Song Builder: Presets, or build your own. Picking the style, drummer, kit, and song layout.
22:38 - Simple routing to an external drum module (ie. Addictive, BFD, EZDrummer).
25:34 - Song Sheet, part 1: An in-depth examination.
33:48 - Drum Kits: An in-depth examination.
42:08 - Setting output routings (this is in the middle of the drum kits section).
42:57 - Back to the drum kit in-depth examination.
46:50 - Editing a piece of your drum kit.
48:50 - The Mixer: An in-depth examination.
52:55 - Using an external MIDI controller.


Part 3 of 4 - Intermediate and Advanced Editing

00:00 - Introduction, topics in this part of the series.
05:43 - A few quick notes about the using Reaper as a DAW or Audio Editor.
08:15 - Reaper set-up and technical notes.
11:51 - The Transport: An in-depth examination.
21:54 - Dragging and dropping MIDI data from a previous performance into your DAW.
25:29 - Using live loops while performing in real-time.
28:08 - Song Sheet, part 2: More stuff that I missed earlier, including bars and parts.
35:56 - The Brain, part 1: An in-depth examination.


Part 4 of 4 - Options, the Bar Editor, and Final Thoughts

00:00 - Introduction, topics in this part of the series.
01:07 - A few notes about using Ableton Live, and a few cool tricks.
09:28 - Brain Controls, part 2: More in-depth stuff.
12:48 - Bar Editor: An in-depth examination.
27:23 - Style and Drummer models, and the Brain's approach to composition.
30:55 - The Options Menu.
36:20 - Time Signature changes.
37:51 - Jamming along with audio.
38:57 - Using Restore Points.
39:40 - My final thoughts and comments.


Alright, that should help some people out. 


I'm Jonathan Clark, known online as DJ Bolivia.  Do you want to learn more about DJ'ing and music production?  If so, visit:


If you happen to enjoy techno tracks, most of my tracks are available as free downloads from this link:


Thanks so much for visit, and for your support!  I really appreciate the fan base that I've been able to build up over the years.

Also, if you want to visit any of my other sites, here are a few links:
    YouTube:  youtube.com/djbolivia
    SoundCloud:  soundcloud.com/djbolivia
    Blogger:  djbolivia.blogspot.com
    Main Site:  www.djbolivia.ca

Sunday, January 11, 2015

Jamstix Software - Part 2 of 4 - Covering All the Basic Operations

This is the second in a series of four tutorials about the Jamstix drum track creation software.  However, before I go any further, I made massive updates to my website in early 2024.  All of my Jamstix info is available there too, and I'd recommend that you move over there, unless you like the format of my blog better.  The info on my website is more up-to-date.  Here's the link:


Jamstix is pretty amazing, as I have already said in the first video in this series.  After I'm done this series, I'll do a set of videos where I create two complete songs from scratch.  If you want to see the way I work, you'll be able to watch just as if you were sitting beside me at the computer.  But first, let's start to go into more depth with the software now that you know what it's all about.  We'll begin by taking a closer look at the Song Wizard.

In case you'd rather just watch the full video that matches this blog post, here it is.  I used Cubase as the host in this part of the tutorial:


The Song Builder

Ok, so when you first open Jamstix within your host, you'll see the "Song" section of the upper right side main menu.  On the left side, you'll see a ton of choices of "Quick Start" songs.  There's a lot of variety there, based on different music styles mixed with various drummer personalities.  Some examples:
- Twelve bar blues
- Disco track using "Chad" (probably Chad Smith of the Red Hot Chili Peppers?)
- Generic jam sessions
- Jamcussion songs
- Motown using "Phil" (probably Phil Collins of Genesis)
- Reggae with Stewart (probably Stewart Copeland of The Police)
- Standard song
- Lots of others

Let me just interrupt my own train of thought for a second to mention Jamcussion.  It's not available in the most basic version of Jamstix, but it's in a lot of the other more comprehensive versions.  Basically, it's a percussion add-on.  Think of latin instruments, hand drums, etc., all the sort of rhythm section instruments that aren't part of a normal drum kit.  If you are using Jamcussion, it runs in conjunction with (but sort of as a separate unique identity to) the main drum kit.

On the right side of the Main Menu you'll see the Song Builder.  This lets you set the rules.  Start with laying out the structure in terms of parts.  Each part has a unique initial.  Here's a list:
- I = Intro
- V = Verse
- P = Prechorus
- C = Chorus
- B = Bridge
- D = Drum Solo
- S = Solo
- E = Ending

I'm hoping that the next version of Jamstix adds some extra choices, such as a Silent section, Breakdown, and Refrain.  But those aren't critical, there are ways to emulate all of those concepts.  As it stands now, you can easily make anything work.  You might have to get a bit creative, ie. for a Verse/Refrain song, you might want to build it as Verse/Chorus.  That doesn't matter.  You can adjust the lengths of each part no matter what you call them.  As Shakespeare once said, "What's in a name?"

Next comes the Style.  It may say "8th Rock" as a default.  Go in and explore some of your own choices.  I have the full "Studio" version of Jamstix, so I have a lot of extra styls and drummers and expansion paks.  In total, I currently have 510 different styles in 28 different groups.  Some of the 28 groups include:  Afro-Cuban, blues, funk, breakbeat, electronic, gospel, drum & bass, metal, march, Motown, country, R&B, surf, and others.

Click on the little black triangle that appears to the left of some of the styles, and you will see a bunch of sub-categories.  For example, under "rock" I have eleven different sub-categories.  Under "country," I have eight.  Under "other world rhythms," I have Beguine, Bolero, Middle Eastern, and Tango.  And finally, under Jamstix 1 (the legacy styles) I have what looks like a couple hundred different styles.  After you choose a style, you can click on the default button to the right to set it as your default, if you want.  Once you've picked a style, don't forget to press "Load" to load the samples into the player.

Next, you can pick your drummer.  The default is probably "James Stix," the usual Jamstix default.  I have a couple dozen other drummers who, as I alluded to in the last video, have first names that match a lot of famous drummers.  I'm pretty sure that I know who over half of them are, and I'll put my list of guesses at the bottom of this blog post.  There's probably a full list online somewhere.

In addition to the named drummers, there are a couple of special presets.  For example, "Latino" specializes in Latin flavours.  "Machine" is used in electronic styles where a more "drum machine like" behavior is desired, by disabling the limb transition time logic and avoiding timing or power variations.  There's also  a "Silent" drummer who doesn't create or modify any notes (this is good when you're hand editing a part that's already laid down).  There's a player description on the right side of the drummer panel to give you some feedback about the style of each drummer.  Again, once you've picked your drummer, don't forget to click on the "Load" button.

The next item you can pick is the kit.  When I did the demo song for the previous video, I stuck with the default, the Standard Rock Kit.  However, since I have the Studio version of Jamstix 3, I actually have 146 different kits to pick from.  Again, there are broad categories on the left side, including kits to match a lot of the "Style" choices we've already covered.  But you don't have to match a kit to its style.  You could pair a New Orleans Jazz kit with a Drum and Bass style if you want.  And of course, many of the styles have a black triangle beside them which you can click to see a list of sub-styles.  If you're looking at using a kit style that has sub-styles, you must actually pick which sub-style you're going to use.  For example, you can't just pick "drum and bass" as a generic kit style, without deciding on which particular sub-style you'll use.

A couple of the kits are special.  You'll see kit categories for Additive Drums, BFD, and Toontrack (EZDrummer).  If you look at the kit contents on the right side of the window, you'll notice that these say "MIDI output only," whereas all the other kits listed info to show where the audio samples will come from, and perhaps some description of the piece of kit.  The reason these say "MIDI output only" is because they are default routings.  You don't get the sound of BFD, etc., unless you happen to own that particular third-party drum module software or sound bank.  However, they're good to have, because if you do own Addictive or BFD or EZDrummer, this is a perfect quick way to route the Jamstix MIDI out to your other drum module and take advantage of the high quality samples.

Once you've picked the kit you want to use, make sure you click on the "Load" button on the lower right, to load it into the player and return you to the Song Builder menu.

If you have a version of Jamstix that includes the Jamcussion expansion, you'll also need to pick a Style, Drummer, and Kit for your Jamcussion sounds.  Remember that Jamcussion, if you have it, is a hand percussion based rhythm section that can accompany your main kit, or even play alone without a kit.  Picking the Style, Drummer, and Kit of the Jamcussion section is done exactly the same way as picking the Style, Drummer, and Kit of the main drum kit, although of course this is hand percussion based, so all the styles and drummers and kits are different.  You may want to experiment a lot here to find a Jamcussion kit that sounds appropriate with the main kit you picked.  Or then again, you may not.

I know that I said earlier that it's easy to put together a song really quickly, but I just showed you a lot of complicated choices.  Don't worry, you'll quickly start getting used to the choices of Styles, Drummers, and Kits available, and it won't feel like you're dealing with much.  And worse case, if you're confused at the start, you can just ignore it all and use the defaults.

We're just about finished creating your first song.  You just need to pick how many bars you'll have in a standard verse in your song, and how many in a standard chorus.  After you do that, click on the "Create A Song" button, and look over at your Song Sheet editor window on the left.  Your song should now be all laid out for you.


Song Sheet

At this point, you might want to make some minor tweaks in your song.  Do you need to change the number of bars in any of your parts?  You can double-click on the part's name (or anywhere else on the line) and it comes up with a list of things you can edit.  You can rename the part, change the number of bars in the part, or change the number of repetitions.  You can also change the time signature if you enable this in Options, but remember that Jamstix still syncs to the tempo of your host.

There are a couple other columns on your song sheet that you can play with if you want.  The RF column stands for Repeating Fill.  If this is checked, Jamstix plays a fill whenever the part is repeated.  The TF is Transition Fill, and if checked, a fill gets played on the last bar of the part.  The TRG column deals with trigger keys for Live Loop mode.  I'll talk about that in one of the other videos, it isn't important for most users.


Drum Kit

Ok, so now that we've gone through the Song Sheet, let's take a closer look at the kit we've picked.  Click on the kit tab up to the right in the Main Menu area.  I already demonstrated in the last video that you can click on different parts of the kit to preview different drums.  Also, because most of them have multiple articulations (sounds), you can hear different sounds depending on exactly where on the graphic you clicked.  This is slightly tied to a way of letting you preview MIDI velocity variations.  I'm going to try to avoid getting deeply into MIDI here, but the short version, if you don't understand MIDI, is that as you have higher "velocities" for notes or hits, the audio volume will probably also increase, and the type of sound of the hit can also change.  For example, a low velocity hit on a ride cymbal might be fairly quiet and sound like a light pinging sound with reverb, whereas a heavy velocity will probably be louder and might sound more like a "clunk" when it hits.

Depending on your kit, you may see other things like jam blocks, shakers, eggs, cowbell, tambourine, chimes, etc., spread out on the visual display around your kit.  Try clicking on some of them to preview them (this only works if the song is playing in the host).

If your song is playing, parts of the kit will light up as they're hit.  Watching a performance from overhead as your song plays is a good education in itself.  If you want to single out a specific part of your kit to see its effect on the performance in progress, you have two useful options.  You can hold Ctrl and left-click on that piece and it will be solo'd, while the rest of the kit is muted.  If you do a Shift-click, the piece is muted while the rest is solo'd.  These key commands are presumably different in the Mac version.

If you turn off the lock button, you can move pieces of the kit around.  I mentioned this in the first video.  If you pull a piece of the kit away slightly, the drummer will be less inclined to use it.  Pull it too far out of his reach and he will stop using it completely.  Rearranging the layout of the kit can affect the drummer's performance.

The dice icon is also interesting.  Click on it and the main kit will be rearranged somewhat, both in terms of layout and exact drums present, depending on what's available.  Go ahead and try it.  It can't hurt.

Up to the top left of the graphic of the kit, you'll see a drop-down tab beside the kit name.  Check it out.  Here's where you can adjust output routings if your host allows it.  Many hosts allow for up to eight separate outputs, although right now, Pro Tools is limited to a single stereo master out.  Be aware, as the manual states, you might have to configure your host to support multiple audio outputs or else you'll only hear the sounds going to the first output.  This depends on which host you're using.  If this all sounds like Greek to you, don't worry – the default value is for it to just work without any adjustments.

There are also a number of options in this menu for sending audio or MIDI output.  Hopefully they're fairly self-explanatory.

The closed hi-hat variations menu lets you affect how much variety you'll get in the high hats, which can impact the realism of the performance.  Directly underneath that, you can turn position based dampening on or off.

Resetting the visual kit arrangement doesn't seem to affect a kit generated from the dice, but if you pulled an individual piece of the kit away manually, this returns everything to an optimal placement.

Finally, the Key Map options are related to MIDI, which a lot of people won't worry about.  I'll skip those for now, but if you're really experienced with MIDI, the Key Map is the assignment list as a tabbed text file.

Next, try to right-click on part of the kit.  Now you have the option to remove the piece you clicked on, change its sound, or add another piece to the kit.  Try playing with some changes to your kit.  There are tons of options.  Remove a piece, change a couple, and add something else.  You'll find that there are tons of choices and its fun and easy to make big changes.  If you like what you've created, there's a save button in the upper right.  If you don't like what you've created, click on the "Load" button (or double-click the kit name over to the left) to bring up a new kit on screen.

Open the kit list again by clicking Load.  You'll see a couple of options under the list of kit contents:

- Lock Outputs locks the current output assignments so they won't be changed if you load a new kit.

- Lock Mixer locks the mixer settings from being changed by a new kit.

- Keys Only will mean that Jamstix only loads key assignments and not sounds or mixer settings.  This is for advanced users.

Finally, there is a "Filter" box at the bottom of the window.  This box lets you control what gets loaded when you load a new kit.  This is handy for lots of creative kit composition.  Maybe you like most of your current kit except for the cymbals.  Click on "Cymbals Only" to load cymbals from another kit while leaving the rest untouched.


Editing The Kit

To edit part of your kit, click on one of the pieces.  That piece can be changed with the kit editor down below.  You can click on the name to load a different sound.  You can change the volume, pan, ambiance, dampening, or tuning of that piece of the kit.  You can change MIDI parameters, if you're comfortable with advanced MIDI use and routing. 

On the right side is a velocity scaling graph.  Again, this section is only going to be useful for advanced users.  If you're being fed external MIDI that's playing through your kit and it's all at lower velocities than you'd prefer, you can use this to raise velocity levels in a linear scale or some sort of compressed or expanded curve.  You can also scale velocities down this way.  There's a lot of flexibility to get your MIDI data in to a useful band/range.  The Min and Max buttons are similar here, you can set Min and Max levels and incoming data will scale in that range.


Mixer

Next, let's jump over to the Mixer tab of the Main Menu.  You'll see that it's an eight channel mixer.  If you change the number of outputs you're using, you'll have to totally shut down then re-load your host, since audio outputs are set during the opening of your host when VST plug-ins are loaded. Also, remember that in the current version with AAX compatibility, Pro Tools is limited to a single master out.

Let me cover the features of the mixer in point form:

- The drop-down tab at the upper left lets you load or save mixer settings.

- When you start out, the EQ button is depressed and you have low/mid/high EQ knobs beside each channel slider.

- Click on the Comp knob and the EQ knobs will get switched out for four knobs controlling compressor settings.  If you know how a compressor works, they'll make sense.  From top to bottom, they control your threshold, attack, release, and wet/dry mix.  The blue button turns the compressor on and off.

- Click on the Echo knob and your compressor controls will be replaced by delay controls.  Top to bottom, the three knobs control feedback, low pass filter, and wet/dry mix.  The delay is also synchronized to the host's tempo.  So the 8th means eight note delay.  Click on it to see a list of choices, down to 48th note.  The –C- below it means that the delay is centered, but it can be changed to a slow or fast pan if you want.

- The Flip Stereo toggle changes audio from drummer's to audience perspective.

- Downmix puts all outputs to channel 1.

- The AMB To Last toggle will direct all ambient effects to the highest output channel.

- If MIDI Only is enabled, audio samples are unloaded and MIDI just routes to the host or to a drum module.

- The AMB knob controls the overall ambiance level for the currently selected drum or Jamcussion kit.

- DMP controls the dampening of the room's simulated ambient sound.

- WID adjusts the stereo panning of the kit.  All the way left is mono, all the way right is full width stereo.


MIDI Remote Control

I've tried to avoid getting into MIDI in this video, to keep it simple for people who don't need to play with MIDI.  But some of you may know that separate from MIDI note data, you can use what's called a MIDI controller to adjust controls in your software more easily than doing everything with a mouse.

If you don't understand what a MIDI controller does, you should.  You don't need an indepth knowledge of MIDI to understand or use one!  First, remember that it's called a MIDI controller primarily because it's using MIDI in the background as a communications system to control stuff.  So it's less technical than you might have expected.  It did a comprehensive video about MIDI controllers not long ago.  I really recommend that you check it out to understand exactly what a MIDI controller is capable of.


Anyway, the point of this is that you can control all of the mixer controls simultaneously using a MIDI controller.  This is so much easier and more powerful than trying to use a mouse!  Of course, if you're comfortable with automation, you can also automate controls by drawing or recording envelopes.  So much power.  Strap yourself in and feel the G's.


Conclusion

You may have questions about the software.  Rayzoon has an active and useful online support forum.


Go to their website and click on the forums link.  I can also try to answer questions on YouTube, but remember that I spend nine months of each year living in a remote forestry work camp with practically no internet.  I'll answer eventually, but you'll get a MUCH faster response on Rayzoon's forums.


PS – the Drummers

I promised a list of my guesses about who some of the drummers are modeled upon …

Animal, from The Muppets
Carter Beauford – Dave Matthews Band
Charlie Watts – Rolling Stones
John Bonham – Led Zeppelin
Phil Collins – Genesis
Roger Taylor – Queen
Stewart Copeland – The Police
Mark Brzezicki – The Cult
Danny Carey – Tool
Lars Ulrich – Metallica
Chad Smith – Red Hot Chili Peppers
Keith Moon – The Whoe
Tony Thompson – Power Station
Will Champion – Coldplay

However, as Jamstix points out, "Drummer models are fictional and not endorsed by actual drummers with the same first name."


By the way, I've created a clickable index for the whole series, so if you've watched everything but you want to review a certain section, this might come in useful. CLICK HERE to go to that index.


I'm Jonathan Clark, known online as DJ Bolivia.  Do you want to learn more about DJ'ing and music production?  If so, visit:


If you happen to enjoy techno tracks, most of my tracks are available as free downloads from this link:


Thanks so much for visit, and for your support!  I really appreciate the fan base that I've been able to build up over the years.

Also, if you want to visit any of my other sites, here are a few links:
    YouTube:  youtube.com/djbolivia
    SoundCloud:  soundcloud.com/djbolivia
    Blogger:  djbolivia.blogspot.com
    Main Site:  www.djbolivia.ca

Monday, January 5, 2015

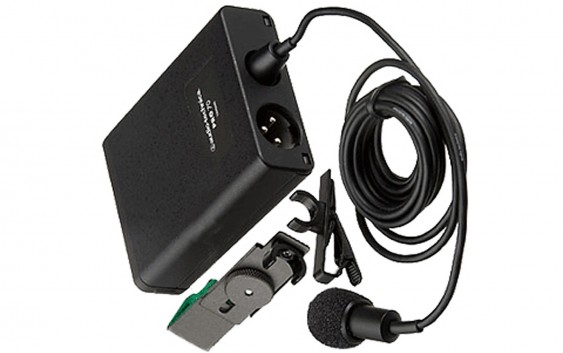
Review of the Pro 70 Lavalier Condenser Microphone from Audio Technica

My current preferred lav is the Pro 70 lavalier microphone from Audio Technica. It's a low to mid-budget microphone, not wireless, so you'll hopefully pay less than $150 for it. It's been working decently for me, so I thought I'd do a quick overview.


This isn't an overly technical review, with all kinds of lab-testing of audio recordings. I've just covered all the basics, and talked about lav mics in general. It has a reduced dynamic pickup range compared to any studio condenser microphone that you'd buy, at around 100 Hz to 14 kHz, but that's standard for a lavalier and you'll have pretty decent quality for whatever project you're working on. If you want to just watch the video review, here's the link, although I'll also include the specs of these mics further down in this blog post:


Here is the general overview of the Pro 70, taken directly from the Audio Technica website:

This miniature condenser microphone achieves full-sounding pickup and is known for outstanding consistency and dependable performance. Supplied with both a clothing clip and guitar mount, it provides natural and articulate vocal reproduction when used as a clip-on lavalier and excels in pickup of acoustic guitar. The PRO 70 is designed to make music and speech clearly and comfortably audible, yet never draw attention to itself or its operation. The microphone is equipped with a low-frequency roll-off switch that allows for reduced pickup of room noise. The versatile PRO 70 may be powered by either battery or phantom power. Its cardioid polar pattern reduces pickup of sounds from the sides and rear, improving isolation of the desired sound source.


Here is a general list of features of the Pro 70:

- Miniature condenser microphone is ideal for both vocal and acoustic guitar applications
- Natural and articulate vocal reproduction when used as a clip-on lavalier—clothing clip included
- Excels in pickup of acoustic guitar with included instrument adapter
- Cardioid polar pattern reduces pickup of sounds from the sides and rear, improving isolation of desired sound source
- Switchable low-frequency roll-off
- Corrosion-resistant contacts from gold-plated XLRM-type connector
- Operates on battery or phantom power
- 6' (1.8 m) cable permanently attached between microphone and power module


Here is a general list of the technical specifications of the Pro 70:

- Element Pattern: Fixed-charge back plate, permanently polarized condenser
- Polar Pattern: Cardioid
- Frequency Response: 100-14,000 Hz
- Low Frequency Roll-Off: 80 Hz, 8 dB/octave
- Phantom: -45 dB (5.6 mV) re 1V at 1 Pa
- Battery: -45 dB (5.6 mV) re 1V at 1 Pa
- Impedance Phantom: 200 ohms
- Impendance Battery: 200 ohms
- Maximum Input Sound Level: Phantom: 123 dB SPL, 1 kHz at 1% T.H.D. Battery: 123 dB SPL, 1 kHz at 1% T.H.D.
- Typical Dynamic Range: Phantom: 96 dB, 1 kHz at Max SPL. Battery: 96 dB, 1 kHz at Max SPL
- Signal to Noise Ratio: 67 dB, 1 kHz at 1 Pa
- Phantom Power Requirements: 11-52V DC, 2 mA typical
- Battery Type: 1.5V AA/UM3
- Battery Current/Life: 0.4 mA / 1200 hours typical (alkaline)
- Switch: Off, on-flat, on-roll-off
- Weight of Microphone: 0.3 oz (8 g)
- Weight of Power Module: 4.7 oz (134 g)
- Dimensions of Microphone: 0.98" (25.0 mm) long, 0.40" (10.2 mm) diameter
- Dimensions of Power Module: 3.27" (83.0 mm) H x 2.48" (63.0 mm) W x 0.87" (22.0 mm) D
- Output Connector: Integral 3-pin XLRM-type
- Cable: Integral 6' (1.8 m), permanently attached between microphone and power module
- Accessories furnished: AT8411 clothing clip; AT8444 instrument adapter; power module; windscreen; battery; soft protective pouch
- Audio Technica Case Style: M1


As I've mentioned, I've owned the Pro 70 for a while now and I've been pleased with it, so I figured it was worth a review.


I'm Jonathan Clark, known online as DJ Bolivia.  Do you want to learn more about DJ'ing and music production?  If so, visit:


If you happen to enjoy techno tracks, most of my tracks are available as free downloads from this link:


Thanks so much for visit, and for your support!  I really appreciate the fan base that I've been able to build up over the years.

Also, if you want to visit any of my other sites, here are a few links:
    YouTube:  youtube.com/djbolivia
    SoundCloud:  soundcloud.com/djbolivia
    Blogger:  djbolivia.blogspot.com
    Main Site:  www.djbolivia.ca

Sunday, January 4, 2015

Simple Audio Editing Tutorial

I've been working on a couple of microphone review videos this weekend, and in each, I did a bit of audio editing of test recordings. These weren't high-quality comparison testing recordings, where the microphones were lab-tested against competing brands, just short tests of a few of my favorite current microphones (studio condenser mics, a lav mic, and a shotgun mic).


In each of the videos, I did some simple audio editing to tidy up the video, similar to what I might have done if I was using the audio in a project. The steps included some basic noise reduction, some equalization, and adding a light touch of reverb. To spare the effort of explaining what I was doing in each microphone video, and keep them shorter, I figured that I'd do a separate video to explain those steps in detail, so just the people who were curious could learn more, and it wouldn't detract from the microphone reviews. Here is that video:


Later this week, I'll add links to some of those other microphone review videos here, for anyone who is curious. Here's the first one:


I also referred to another tutorial during the middle of this video. Here's a link to that other tutorial, which talks in even more detail about basic editing of voiceovers for DJ mixes and other spoken word editing:


I'm Jonathan Clark, known online as DJ Bolivia.  Do you want to learn more about DJ'ing and music production?  If so, visit:


If you happen to enjoy techno tracks, most of my tracks are available as free downloads from this link:


Thanks so much for visit, and for your support!  I really appreciate the fan base that I've been able to build up over the years.

Also, if you want to visit any of my other sites, here are a few links:
    YouTube:  youtube.com/djbolivia
    SoundCloud:  soundcloud.com/djbolivia
    Blogger:  djbolivia.blogspot.com
    Main Site:  www.djbolivia.ca

Friday, February 21, 2014

Review of M-Audio's Oxygen 25 MIDI Keyboard Controller


I'm about to hit the road for another eight or nine months, away from my home and studio, so I just picked up a small portable MIDI controller to use when I'm doing production work on the road. I bought the Oxygen 25 controller that is produced by M-Audio. It's very similar to the Oxygen 49 and Oxygen 61 controllers, but more portable.


M-Audio Oxygen 25 MIDI Keyboard Controller Review

In this video, I talked a bit about the controller specs that I researched online before I bought it, then I opened up the package to see what the Oxygen 25 looks and feels like. I played with it for a bit and gave a final opinion, which was positive.


Learning the Basics about MIDI Controllers

If you aren't already aware of what a MIDI controller is, or what it is used for, this basic video will give you the background that you need. For instance, you need to know that a keyboard controller does NOT produce sounds! A synth produces sounds. A MIDI controller can produce sounds if you route its MIDI output through some sort of module (or a computer program) that produces sounds (ie. through a hardware synth module or through a virtual instrument).


Some of the key points that I noted in the Oxygen 25 review video were:

- This unit is "class compliant," which means that you can use it directly on your Mac or Windows computer without having to install drivers.
- Having said that, there are more advanced windows drivers available on the M-Audio website that are necessary if you want to use this device simultaneously on multiple DAW's or apps, or if you want to hook up more than one class-compliant device to your computer simultaneously.
- This has non-volatile memory, which means that it saves presets and controller/channel assignments when powering down. To reset to the factory defaults, hold the "-" and the "+" keys simultaneously.
- M-Audio has software patches that you can download for free which let you use the Oxygen controllers with pre-determined patches that interface well with certain DAW's, specifically with versions available for Cubase, Pro Tools, Reason, Record, Ableton, Garageband, and Logic.
- You can use a standard sustain pedal with this. I tried using my Roland pedal with it, and it worked well.
- There's a spot for a Kensington security cable, if you're worried about using one of those.
- You can set your own velocity curves for key responsiveness. There are four curves available in the menu for touch-responsiveness, and three curves which actually output fixed velocities of 64, 100, or 127.
- If you have a good understanding of MIDI and want to dig further, you should check out the manual (which you can find online pretty easily). There are about twenty pages of very useful and detailed MIDI information in the manual.
- The 25 and 49 and 61 are all quite similar, although the 25 has a couple minor deficiencies compared to the two longer controllers. For instance, the 25 only has one control fader, whereas the other two models have nine each.
- The 25 is currently priced at $99 in Canada from Amazon, while the 49 is $149 and the 61 is $199. Those are probably the same approximate prices that you'd find in the US, since our dollar is pretty close to parity.
- You can use a Device ID function on the 49 and 61 only. So for example, if you want to own three of these keyboards and use them simultaneously in a live performance, that's possible with the 49 and 61, but the 25 cannot have a unique identified in the MIDI system.
- This unit is USB 2.0 compatible, and backwards compatible to 1.1. I presume it works on USB 3.0 ports, but you won't see any performance improvements by using a 3.0 port. However, none are needed.


Here are the basic specs on the Oxygen 25:

- MIDI data from variable controllers
- MIDI control number
- RPN/NRPN
- Program, bank LSB, bank MSB
- Pitch bend
- GM/GM2/XG SysEx messages
- MIDI Data from buttons/switches
- Note on
- Note on/off toggle
- MIDI CC on/Off toggle
- Program, Bank LSB, Bank MSB presets
- MIDI Machine Control functions
- GM/GM2/XG SysEx messages
- 3.7" H x 9.4" W x 16.2" D
- Weight: 3.8 lb.


I'm Jonathan Clark, known online as DJ Bolivia.  Do you want to learn more about DJ'ing and music production?  If so, visit:


If you happen to enjoy techno tracks, most of my tracks are available as free downloads from this link:


Thanks so much for visit, and for your support!  I really appreciate the fan base that I've been able to build up over the years.

Also, if you want to visit any of my other sites, here are a few links:
    YouTube:  youtube.com/djbolivia
    SoundCloud:  soundcloud.com/djbolivia
    Blogger:  djbolivia.blogspot.com
    Main Site:  www.djbolivia.ca

Saturday, February 15, 2014

Exploring USB Microphones


I just uploaded part eleven of my Audio Recording tutorial series (and I have some additional study notes further down in this post). This series as a whole is more related to home studio work than it is to DJ'ing, covering the very basics of audio engineering and production work. 

If you're just discovering this tutorial series and you want to start at the beginning, visit:  djbolivia.ca/audiorecording


Audio Recording Tutorial #11: Working with USB Microphones

In this video, we examine the basic characteristics and features that you might find on many USB microphones, and the advantages and disadvantages that they have compared to traditional studio microphones.


Here are some of the pros and cons of using a USB microphone as compared to a traditional mic routed in through a sound card (I'll start with advantages for the USB microphones):
- Excellent quality is available at very competitive costs.
- USB mics are suitable for most podcasters, home musicians, music students, voiceover talent, and pretty much anyone not wanting to use the internal microphone of your laptop. USB mics even have a place in some professional studios.
- No need for a mic pre-amp.
- Condenser microphones normally need a source of phantom power. This is supplied on the USB line for a USB mic.
- Some USB mics allow for direct headphone monitoring with no latency.
- Many USB microphones have a gain control knob to adjust signal going into your computer.
- Many USB microphones offer the choice between multiple pickup patterns.
- Some of the higher-end USB mics also allow for XLR output into a traditional system.
- Some USB microphones offer variable sampling rates onboard.
- Some USB microphones have a built-in pop filter.

There are a few potential disadvantages to consider too:
- Although some USB mics will work immediately as plug-and-play devices, you may need to install drivers for others (this is the case on both PC's and Macs).
- Many DAW's will only allow for input from a single device at a time. So for instance, if you've got a USB mic plugged into your computer and you also have a sound card hooked up, with other instruments connected to your sound card, you may not be able to record through your USB mic and sound card simultaneously! This is certainly not a problem if you're working on multi-track sessions where each type of audio data is recorded individually. However, if you wanted to, for example, bring in a vocal through the USB mic at the same time as a guitar track through your soundcard, you might be out of luck!

Links relating to USB microphones:


Here are links to a number of microphone manufacturers:


To see the rest of the tutorials in this Audio Recording series, visit:


Thanks so much for visit, and for your support!  I really appreciate the fan base that I've been able to build up over the years.

Also, if you want to visit any of my other sites, here are a few links:
    YouTube:  youtube.com/djbolivia
    SoundCloud:  soundcloud.com/djbolivia
    Blogger:  djbolivia.blogspot.com
    Main Site:  www.djbolivia.ca

Sunday, February 9, 2014

Ableton Q&A Videos related to DJ'ing

Here's a collection of some additional Ableton Live tutorial videos that I've put together for people doing DJ'ing and studio work, based on YouTube viewer questions and feedback.  You can find a complete collection of my Ableton tutorials here:


Intermediate Warping Techniques in Ableton Live

Most of the tracks that I warped in my initial "Warping Tracks in Ableton Live" video were pretty simple to warp. In this video, I picked five EDM tracks of intermediate difficulty to warp, and gave some extra tips and tricks.


Using the Loop, Start, and End Indicators

Looping sections of existing tracks during a real-time DJ performance can add a lot of strength to your performance, and gives you the ability to be more versatile than simply playing other peoples' tracks back from start to finish. This video covers the Loop Indicators and when they can be useful, and also touches on the Start and End Indicators. The practice of looping through the use of the loop indicators should not be confused with a separate but similar-sounding practice in Ableton, namely that of importing and using "looped" audio clips.


DJ'ing with Songs in Non-Electronic Genres

I've had lots of questions about how to include tracks of significantly diverse tempos in your sets, such as hip hop, indie pop, and classic rock. This video explains my own approach to tracks in these genres.


Inserting a New Track in the Middle of Arrangement View

This one is pretty simple, to be honest. How do you insert a new track into the middle of an already-complete production in the arrangement view? This video is pretty short.


Automating Global Tempo in a Studio Production

Here's another short one, based on numerous viewer questions. Once you have a studio-produced DJ Mix set up in the arrangement view, you may want to vary the tempo as the mix plays back. This video shows you how.


Cutting Breakdowns out of Dance Music Tracks

Another very short video. If you've got a track with a quiet breakdown and you don't want your dance floor to lose energy and interest, it might be smart to use Ableton to just remove that breakdown from the song. It's very easy. However, having said that, you should also watch the next video in this post which shows you an alternative to cutting out a breakdown, namely, to keep it and enhance it.


Enhancing EDM Breakdowns with Simple Editing Techniques

As you probably expect, this video teaches you how to spice up an existing track by adding things like extra drums, extra bass notes, etc. This is a medium-length video, but I hope it opens your eyes to all sorts of production capabilities that you might want to start digging into.


Clarifying Warping and Global Tempo:

Many people didn't entirely understand how warped tracks would synchronize together, so this is a short video that aims simply to clarify how warped tracks are treated by Ableton, and how they are tied to the global tempo.


I'm Jonathan Clark, known online as DJ Bolivia.  Do you want to learn more about DJ'ing and music production?  If so, visit:


If you happen to enjoy techno tracks, most of my tracks are available as free downloads from this link:


Thanks so much for visit, and for your support!  I really appreciate the fan base that I've been able to build up over the years.

Also, if you want to visit any of my other sites, here are a few links:
    YouTube:  youtube.com/djbolivia
    SoundCloud:  soundcloud.com/djbolivia
    Blogger:  djbolivia.blogspot.com
    Main Site:  www.djbolivia.ca

Tuesday, April 16, 2013

Audio Recording tutorial #07: Basic MIDI Recording


I just uploaded part seven of my Audio Recording tutorial series (and I have some additional study notes further down in this post). This series is more related to home studio work than it is to DJ'ing, although I'm still covering the very basics of audio engineering and production work.

If you're just discovering these tutorials and want to start at the beginning, visit:  djbolivia.ca/audiorecording  


Audio Recording Tutorial #07: Basic MIDI Recording

In this video, we start exploring basic MIDI recording. I start off with a very brief overview of MIDI, then move into a practical, hands-on tutorial where I play a song on an electronic piano keyboard and record it into Pro Tools. I then do a couple of very basic edits, so you understand how note data can be edited.


If you want to download the audio files that I was using in this video, to better hear the audio (or experiment with it) in your own home studio setup, here’s a link to a zipped folder containing the relevant files. Remember that this is TINY compared to the download files for previous videos. MIDI data takes up almost no space. This file is only 27 kilobytes, compared to the audio files for tutorials two through five which were about a thousand times larger:

www.djbolivia.ca/tutorials/audiorecording07.rar


Links about MIDI:


I'm Jonathan Clark, known online as DJ Bolivia.  Do you want to learn more about DJ'ing and music production?  If so, visit:


If you happen to enjoy techno tracks, most of my tracks are available as free downloads from this link:


Thanks so much for visit, and for your support!  I really appreciate the fan base that I've been able to build up over the years.

Also, if you want to visit any of my other sites, here are a few links:
    YouTube:  youtube.com/djbolivia
    SoundCloud:  soundcloud.com/djbolivia
    Blogger:  djbolivia.blogspot.com
    Main Site:  www.djbolivia.ca

Understanding Decibel Measurement Systems

Decibel-based logarithmic measurement systems are confusing.  This post is directly related to video #08 in my Audio Recording tutorial series, which is embedded below.


Although watching the video is the best way to learn about this topic, because of my illustrations on the whiteboard, I've also put a copy of the audio portion of that tutorial video on SoundCloud, for people who would like to download it to listen to in vehicles, while travelling, etc. Here's the audio-only version:


What Are Decibels?

The decibel is the unit used to measure the intensity of a sound. The human ear is incredibly sensitive. Your ears can hear everything from a light wind rustling through distant trees, to a loud jet engine, and they need to be able to process sounds appropriately. The decibel system is a logarithmic system that is appropriate for exponentially variable sound levels. Incidentally, decibels are also used to measure a large number of other logarithmic-based scales, such as power and voltage levels.

The first need for a decibel system came about many years ago, when telephone companies were trying to measure losses and gains across power grids. They decided to come up with a type of measurement that they named the Bel, in recognition of Alexander Graham Bell's work with early telephones. The decibel is one tenth of a Bel, and is abbreviated dB.

Decibels measure a change in power. Power is the change in energy in a system over time, and is best measured on a logarithmic scale. The range of difference in power levels between the quietest sound that a human can hear and the loudest sound before passing the threshold of hearing and reaching the threshold of pain is about one trillion times, or 10 to the twelfth power! That's a huge difference in scale.

Logarithmic scales are very interesting. Decibel systems are designed so that linear changes in the measurement units (ie. decibels) reflect exponential changes in power levels. Adding to the complexity is the fact that since the ear perceives different power levels on a different logarithmic scale than decibels (perhaps around Log 2, rather than Log 10), we get some very strange mathematical relationships. For example, consider these:

2x power = +3 dB = "slightly louder"
10x power = +10 dB = "about twice as loud"
100x power= +20 dB = "about four times as loud"
1000x power = +30dB = "about eight times as loud"

There are both similarities and differences in the ways that we perceive sound and light. Both are measured by our senses. However, light is a type of radio wave, and sound propagates through a medium in a wave-like pattern due to the oscillation of adjoining molecules. Therefore, light travels at an almost constant speed, whereas sound propagates more quickly when the medium that it is passing through becomes more dense.

Another interesting tidbit is that the difference in power levels between light and sound, as we perceive them, is not similar. With sounds, we can hear a difference between power levels of twelve orders of magnitude, as mentioned above. With light, the difference is only about three orders of magnitude. If you were to take the dimmest possible light that our eyes can see, and increase the power by only one thousand times, it would be at a level approaching the threshold of pain, causing retina damage.

It is also interesting that the power levels in light are much higher than in sounds. The very dimmest light that we can perceive produces about one watt of power. The very loudest sound that we can hear before approaching the threshold of pain produces about one watt of power. If you were able to instantly turn the power output from a 100-watt light bulb into purely sound energy, it would almost certainly deafen you, and possible cause serious injuries to some parts of your body.

In the embedded video (above), I cover the basics of a number of different decibel-based systems. For example, the following are all somewhat related to sound:

dB PWL - decibels power level
dB SIL - decibels sound intensity level
dB SPL - decibels sound pressure level
dBFS - decibels full scale
dBv or dBV - two types of decibels voltage, which use different reference levels
dBu - another type of voltage system
dBw - a type of power measurement


The Digital System for Decibels at Full Scale (dBFS)

Many decibel systems appear to have levels from 0 dB and upwards. However, this can be misleading, since decibels are a ratio, not an absolute quantity. So 0 dB in any system doesn't mean "nothing," it means that you're at the reference level, whatever that happens to be in that particular system. And it is possible to have negative decibel measurements in all systems. You just need to have a quantity or level that is lower than the reference level. Decibels are essentially a ratio.

In digital audio, in an audio editor system, the decibel levels are especially confusing. The dBFS scale starts with the reference level at the top, ie. the highest value. Any signal which is stronger than the reference level is a type of digital distortion. All other signals are measured in negative decibels, going down towards the noise floor.

Because of the special relationship between voltage and power, whereby voltage changes squared are in a direct relationship to power, the effect is that in a voltage system, a 6 dB increase means a doubling of the level, and a 6 dB decrease means the level is cut in half. In a 16-bit system, it is only possible to cut a signal in half sixteen times, going down 6 dB with each reduction to 50%. Therefore, a 16-bit system has a noise floor of -96 dB. In contrast, a 24-bit system has eight extra bits, and the noise floor is eight "levels" (of 6 dB each) lower, or around -144 dB. With a lower noise floor in a 24-bit system, there is a better potential dynamic range, and a more desirable signal-to-noise ratio. Of course, even that gets complicated, because you must differentiate between instrumentation noise and physical/external noise.

Does louder translate to "better" or "worse," and why? Well, humans usually perceive louder sounds to be better sounding. I don't know why. Maybe it's an evolutionary thing or an inherent biological preference - our brains just naturally prefer sounds that are easier to hear? Some audio engineers use this characteristic to their advantage, for better or for worse. In terms of producing music, an audio engineer will often try to increase the average volume level of a song through the use of compression, to make it sound "better" than other songs played around it. Unfortunately, the race to over-compress music has resulted in a loss of dynamic range in a lot of modern music.


Parting Words

Obviously, I’ve covered these subjects in a fairly superficial manner. If you watch the embedded video, I've covered all of these things in much more detail, so hopefully that will give you a lot of additional insight. Now you know the general theory behind these subjects, and why they're important to audio engineers. If you want to do further research on your own, I’ll put some links here now. Be forewarned! The physics and mathematics behind logarithmic systems can be pretty intense!


Links to other articles about Decibel systems:


To see the rest of the tutorials in this Audio Recording series, visit:


Thanks so much for visit, and for your support!  I really appreciate the fan base that I've been able to build up over the years.

Also, if you want to visit any of my other sites, here are a few links:
    YouTube:  youtube.com/djbolivia
    SoundCloud:  soundcloud.com/djbolivia
    Blogger:  djbolivia.blogspot.com
    Main Site:  www.djbolivia.ca

Nyquist, Anti-Aliasing, Quantization Noise, and Dithering

If you want to produce better music, you should understand the Nyquist theorem, anti-aliasing, & dither.  This post is directly related to another of the videos in my Audio Recording tutorial series (#09), which is embedded below.

As an overview, this post is going to cover topics including the Nyquist-Shannon Sample Theorem, Fletcher-Munson curves/charts, what aliasing is and how anti-aliasing is used to eliminate it, what quantization noise is, and finally, how dithering can be used in various ways, such as increasing sampling accuracy over a broad range of samples, or masking problems in audio. If you want to watch the video first, here it is:


Although watching the video is the best way to learn about this topic, because of my illustrations on the whiteboard, I've also put a copy of the audio portion of that tutorial video on SoundCloud, for people who would like to download it to listen to in vehicles, while travelling, etc. Here's the audio-only version:


Nyquist-Shannon Sampling Theorem

So why are CD’s sampled at 44.1 Hz? If film/video is often shown at between 24 and 30 frames per second, why is audio at more than a thousand times that rate? Why not sample at something like one thousand times per second or a nice round number like 10,000 Hz? Well, first of all, in movies, you aren’t sampling a frequency, you’re showing the equivalent of a photograph. Completely different situations. But as for the 44,100 Hz, we first need to understand the bare essentials of the Nyquist Theorem, which I only touched on very briefly in Audio Tutorial #06.

The Nyquist-Shannon Theorem was named first and foremost after a scientist (Harry Nyquist) who published research in 1928 about pulse samples, although that research wasn’t actually exactly about the Theorem that later bore his name. In fact, quite a few different scientists contributed to the subject. And sometimes it’s just called “The Sampling Theorem.” Personally, I’m glad that Claude Shannon got his name attached, because Shannon invented Boolean algebra, which is unquestionably the most important mathematical invention of the 20th century: without it, we would not have computers. Look him up.

The Nyquist Theorem essentially states that if you’re going to capture an audio signal (record a sound) accurately, your sample rate must be at least double what the highest frequency in the signal is. Let me break this down. We’re talking about a situation where a real-life sound (analogue) needs to somehow be converted into a digital representation (sampled). Essentially, the more frequently a sound is sampled, the more accurate the results will be: the digital waveform that is created will be closer to whatever the real waveform originally was. So Nyquist basically stated that in the search to determine what is the “minimum bare acceptable,” taking your highest frequency and doubling it gives you an accurate sample frequency.

Let me also define a term right now that is important. Whatever sample rate you pick, the “Nyquist frequency” is half that rate. So for CD audio, the Nyquist frequency is 22.05 kHz. For DVD-V, which is sampled at 48 kHz, the Nyquist frequency is 24 kHz.

Now of course, the math to back this up is complex, but I don’t want to get bogged down in higher mathematics. Think of it this way: If you don’t take enough samples, you’ll get an inaccurate representation of the original audio signal. I’ve talked about that in the accompanying video. But when you take at least two samples for every oscillation, your representation starts to become fairly accurate. Of course, even higher sample rates would be better and more accurate, but “double the highest frequency” is the bare minimum. And you don't want to go too high above the bare minimum, because that starts to consume excessive computer resources with decreasing incremental gains.

Now, think back to what is considered to be the usual range for human hearing: 20 Hz to 20,000 Hz. Since the majority of people can’t hear anything above 20 kHz, when an audio engineer is doing final mastering on a song, he/she will probably put a filter on the track to try to eliminate frequencies above 20 kHz. Why bother keeping them, if nobody can hear them? So that means that once the mastering is done, the highest frequency is supposed to be around 20 kHz. Use Nyquist, and you’ll see that double that number is 40 kHz, which should be our minimum effective sample rate to hear an accurate representation of the audio.

But wait, 40 kHz is not the same as 44.1 kHz! Well, you have to understand that high-cut filters don’t work perfectly at an exact frequency. It’s more of a roll-off. So if you’re trying to cut everything above 20 kHz, you’ll still have a bit of stuff at 21 kHz and 22 kHz coming through, although it’ll be quite diminished. So some sources say that when the people who wrote the standards for CD’s were trying to come up with a number, they picked 22.05 kHz as being the highest frequencies that really mattered. So double that was 44.1 kHz. And that became the new standard, even though it was a somewhat arbitrary number. Mind you, other sources say that it relates to the fact that video tape was originally used for digital mastering of CD’s and give a highly technical (and plausible) proof of the math as related to video standards. And some other sources point out, perhaps just for fun, that 44,100 is the product of the first four prime numbers squared (two^2 times three^2 times five^2 times 7^2).

Whatever the actual reasoning, the main thing is that people can’t generally hear frequencies above 20 kHz, so the Nyquist Theorem says that they have to be recorded with a sample rate of at least 40 kHz, and for some reason a slightly more conservative number of 44.1 kHz was picked for CD's, and remains the standard to this day.


Fletcher-Munson Curves

A Fletcher-Munson curve is used to represent ranges of "equivalent loudness" at various frequencies. This is a fairly subjective measure, since a person has to estimate the perceived volume of a sound, but tests of large samples of the population have given some fairly detailed results over time. Essentially if you pick a line on the graph, and follow it, you'll be able to see what volume for any particular frequency is required to be "equivalent" in perceived volume to a different frequency at a different actual volume. Here's a chart:


Aliasing and Anti-Aliasing

If an engineer didn’t filter out frequencies above 20 kHz, what would happen? Well, the simple answer is that those frequencies would “still be there” even though we couldn’t hear them. The problem would be that these inaudible frequencies would get sampled. Any frequencies that are at higher levels than half the sample rate don’t get sampled accurately. The equipment doing the sampling perceives a different waveform than what it’s actually looking at.

There is actually a mathematical way to predict the “fake” frequency that the A->D converter perceives. It is the sample rate minus the frequency. So if you had audio at 33.1 kHz going through something being sampled at 44.1 kHz, the converter thinks that it is hearing a waveform with a frequency of 44.1-33.1 kHz, or 10 kHz. So you get artifacts at the 10 kHz frequency in your audio. The 10 kHz frequency is thus called the “alias” of the original frequency, its false identity. To further complicate matters, consider that every sound has harmonics. So a tone at 10 kHz produces harmonics at 30 kHz (among other frequencies), so you also have to consider the affects of alias problems from those harmonics.

Anti-aliasing is very simple. It is the name for the process whereby the high frequencies are filtered out so they don’t create aliases. I referred to this already in the previous section: anti-aliasing is basically just the application of a high-cut filter to eliminate the high frequencies that aren’t needed, so they don’t create aliases (artifacts and distortion) in the good, audible part of the frequency spectrum. By the way, anti-aliasing is also used extensively in graphics, and one of the links at the bottom of this post has some good information re. the graphical applications of anti-aliasing.


Quantization Noise

When you're taking a sample of an instantaneous signal level (ie. analogue-to-digital conversation, or ADC), the difference between your recorded or stored value of the measurement and the true value of the signal is called the quantization noise. Basically, this error is causing by rounding or truncation of data during the sampling of the signal. It can also happen during signal processing and data communication. So in other words, quantization noise is the minor errors in accuracy during any of these processes. Luckily, if quantization noise becomes a problem in your audio, it might be possible to mitigate that with the use of dither.


Dithering

When calculations are performed on audio data, certain patterns arise. That’s because the calculations are all mathematically based, so the results are the same no matter how many times you try the calculation over. Through a complicated process, these calculations can produce audio artifacts in consistent parts of the frequency spectrum that the human ear can notice slightly. The process of down-sampling from 24 to 16-bit can cause those same unwanted patterns. We want to get rid of those patterns, to make the audio sound smoother. And as noted above, we can also have problems with quantization noise that occurs during the sampling process.

Dithering is a process by which a tiny bit of random “noise” is added during processing, and it has the effect of “smoothing out” anomalies. A real-world attempt at an analogy? Let’s say that you’ve got a pool of water that is perfectly still except for the fact that there is a bag of golf balls hanging over it, and a golf ball drops out of the bag into the water once every three seconds. That disturbance, where the golf balls keep hitting, is very obvious. However, if in addition to the golf ball, there are tons of small pebbles landing all over the surface randomly, the disturbance of the golf ball is a lot less obvious. The other small bits of noise help “drown out” the obvious disturbance. I guess that a more realistic analogy would be on a golf course. If you shank a ball into a water trap on a calm day, it’s easy to see it land in the water. But if there is rain disturbing the surface of the water, it’s a lot harder to notice the golf ball hitting. Think of the obvious disturbance of the golf ball as being analogous to the audio artifact that we need to mask, and the constant disturbances from the rain as being our noise for dithering.

The availability of excellent dithering algorithms on most systems today, combined with 24-bit recording capabilities (which means the noise floor in a digital system is extremely low) means that you don’t really have to worry about recording signals at a fairly low level and then having to deal with lower-resolution quantization noise, or systemic noise. So when you’re recording a multi-track project, you don’t have to try to get every single track up around -5 to -3 for best results. You can probably record everything down around -12 to -10 and give yourself lots of headroom to work with during mixing, without running into noise problems.

If you’ve done your project at one level and want to down-sample the final result (ie. converting a 24-bit session to a 16-bit track destined for CD), you take that final version of your song and convert it. There will usually be an option in your audio editor that asks if you want to apply dither when down-sampling. There are also lots of complicated options and algorithms that can be applied, with respect to dither types and noise-shaping. That’s beyond the level of discussion that we want to get into today. Just go with the defaults if you’re not sure what to pick. If things sound funny after the down-sample, try against with a different algorithm.


Parting Words

Obviously, I’ve covered these subjects in a fairly superficial manner. Baby steps. Hopefully, if you watched the video, that gave you a lot of additional insight. Now you know the general theory behind these subjects that are important to audio engineers. If you want to do further research on your own, I’ll put some links here now. Be forewarned! The physics and mathematics behind these topics can be pretty intense! Especially with dithering algorithms.


More of my Understanding Sound tutorials:
To see the rest of the tutorials in this Audio Recording series, visit:


Thanks so much for visit, and for your support!  I really appreciate the fan base that I've been able to build up over the years.

Also, if you want to visit any of my other sites, here are a few links:
    YouTube:  youtube.com/djbolivia
    SoundCloud:  soundcloud.com/djbolivia
    Blogger:  djbolivia.blogspot.com
    Main Site:  www.djbolivia.ca