Showing posts with label vocal. Show all posts

Monday, January 5, 2015

Review of the Pro 70 Lavalier Condenser Microphone from Audio Technica

My current preferred lav is the Pro 70 lavalier microphone from Audio Technica. It's a low to mid-budget microphone, not wireless, so you'll hopefully pay less than $150 for it. It's been working decently for me, so I thought I'd do a quick overview.


This isn't an overly technical review, with all kinds of lab-testing of audio recordings. I've just covered all the basics, and talked about lav mics in general. It has a reduced dynamic pickup range compared to any studio condenser microphone that you'd buy, at around 100 Hz to 14 kHz, but that's standard for a lavalier and you'll have pretty decent quality for whatever project you're working on. If you want to just watch the video review, here's the link, although I'll also include the specs of these mics further down in this blog post:


Here is the general overview of the Pro 70, taken directly from the Audio Technica website:

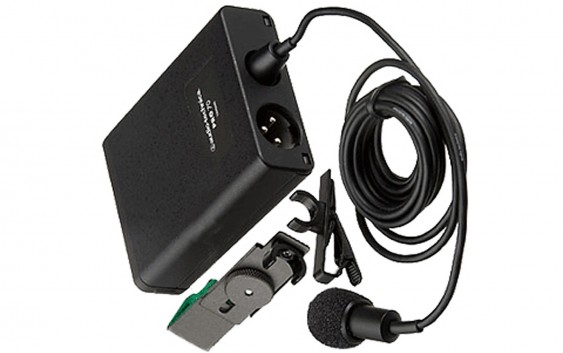
This miniature condenser microphone achieves full-sounding pickup and is known for outstanding consistency and dependable performance. Supplied with both a clothing clip and guitar mount, it provides natural and articulate vocal reproduction when used as a clip-on lavalier and excels in pickup of acoustic guitar. The PRO 70 is designed to make music and speech clearly and comfortably audible, yet never draw attention to itself or its operation. The microphone is equipped with a low-frequency roll-off switch that allows for reduced pickup of room noise. The versatile PRO 70 may be powered by either battery or phantom power. Its cardioid polar pattern reduces pickup of sounds from the sides and rear, improving isolation of the desired sound source.


Here is a general list of features of the Pro 70:

- Miniature condenser microphone is ideal for both vocal and acoustic guitar applications
- Natural and articulate vocal reproduction when used as a clip-on lavalier—clothing clip included
- Excels in pickup of acoustic guitar with included instrument adapter
- Cardioid polar pattern reduces pickup of sounds from the sides and rear, improving isolation of desired sound source
- Switchable low-frequency roll-off
- Corrosion-resistant contacts from gold-plated XLRM-type connector
- Operates on battery or phantom power
- 6' (1.8 m) cable permanently attached between microphone and power module


Here is a general list of the technical specifications of the Pro 70:

- Element Pattern: Fixed-charge back plate, permanently polarized condenser
- Polar Pattern: Cardioid
- Frequency Response: 100-14,000 Hz
- Low Frequency Roll-Off: 80 Hz, 8 dB/octave
- Phantom: -45 dB (5.6 mV) re 1V at 1 Pa
- Battery: -45 dB (5.6 mV) re 1V at 1 Pa
- Impedance Phantom: 200 ohms
- Impendance Battery: 200 ohms
- Maximum Input Sound Level: Phantom: 123 dB SPL, 1 kHz at 1% T.H.D. Battery: 123 dB SPL, 1 kHz at 1% T.H.D.
- Typical Dynamic Range: Phantom: 96 dB, 1 kHz at Max SPL. Battery: 96 dB, 1 kHz at Max SPL
- Signal to Noise Ratio: 67 dB, 1 kHz at 1 Pa
- Phantom Power Requirements: 11-52V DC, 2 mA typical
- Battery Type: 1.5V AA/UM3
- Battery Current/Life: 0.4 mA / 1200 hours typical (alkaline)
- Switch: Off, on-flat, on-roll-off
- Weight of Microphone: 0.3 oz (8 g)
- Weight of Power Module: 4.7 oz (134 g)
- Dimensions of Microphone: 0.98" (25.0 mm) long, 0.40" (10.2 mm) diameter
- Dimensions of Power Module: 3.27" (83.0 mm) H x 2.48" (63.0 mm) W x 0.87" (22.0 mm) D
- Output Connector: Integral 3-pin XLRM-type
- Cable: Integral 6' (1.8 m), permanently attached between microphone and power module
- Accessories furnished: AT8411 clothing clip; AT8444 instrument adapter; power module; windscreen; battery; soft protective pouch
- Audio Technica Case Style: M1


As I've mentioned, I've owned the Pro 70 for a while now and I've been pleased with it, so I figured it was worth a review.


I'm Jonathan Clark, known online as DJ Bolivia.  Do you want to learn more about DJ'ing and music production?  If so, visit:


If you happen to enjoy techno tracks, most of my tracks are available as free downloads from this link:


Thanks so much for visit, and for your support!  I really appreciate the fan base that I've been able to build up over the years.

Also, if you want to visit any of my other sites, here are a few links:
    YouTube:  youtube.com/djbolivia
    SoundCloud:  soundcloud.com/djbolivia
    Blogger:  djbolivia.blogspot.com
    Main Site:  www.djbolivia.ca

Saturday, February 15, 2014

Exploring USB Microphones


I just uploaded part eleven of my Audio Recording tutorial series (and I have some additional study notes further down in this post). This series as a whole is more related to home studio work than it is to DJ'ing, covering the very basics of audio engineering and production work. 

If you're just discovering this tutorial series and you want to start at the beginning, visit:  djbolivia.ca/audiorecording


Audio Recording Tutorial #11: Working with USB Microphones

In this video, we examine the basic characteristics and features that you might find on many USB microphones, and the advantages and disadvantages that they have compared to traditional studio microphones.


Here are some of the pros and cons of using a USB microphone as compared to a traditional mic routed in through a sound card (I'll start with advantages for the USB microphones):
- Excellent quality is available at very competitive costs.
- USB mics are suitable for most podcasters, home musicians, music students, voiceover talent, and pretty much anyone not wanting to use the internal microphone of your laptop. USB mics even have a place in some professional studios.
- No need for a mic pre-amp.
- Condenser microphones normally need a source of phantom power. This is supplied on the USB line for a USB mic.
- Some USB mics allow for direct headphone monitoring with no latency.
- Many USB microphones have a gain control knob to adjust signal going into your computer.
- Many USB microphones offer the choice between multiple pickup patterns.
- Some of the higher-end USB mics also allow for XLR output into a traditional system.
- Some USB microphones offer variable sampling rates onboard.
- Some USB microphones have a built-in pop filter.

There are a few potential disadvantages to consider too:
- Although some USB mics will work immediately as plug-and-play devices, you may need to install drivers for others (this is the case on both PC's and Macs).
- Many DAW's will only allow for input from a single device at a time. So for instance, if you've got a USB mic plugged into your computer and you also have a sound card hooked up, with other instruments connected to your sound card, you may not be able to record through your USB mic and sound card simultaneously! This is certainly not a problem if you're working on multi-track sessions where each type of audio data is recorded individually. However, if you wanted to, for example, bring in a vocal through the USB mic at the same time as a guitar track through your soundcard, you might be out of luck!

Links relating to USB microphones:


Here are links to a number of microphone manufacturers:


To see the rest of the tutorials in this Audio Recording series, visit:


Thanks so much for visit, and for your support!  I really appreciate the fan base that I've been able to build up over the years.

Also, if you want to visit any of my other sites, here are a few links:
    YouTube:  youtube.com/djbolivia
    SoundCloud:  soundcloud.com/djbolivia
    Blogger:  djbolivia.blogspot.com
    Main Site:  www.djbolivia.ca

Saturday, February 9, 2013

Sibilance - How Singers and Audio Engineers deal with Sibilant Consonants

Let's talk about sibilance for a few minutes, since I briefly touched on it in my first Audio Recording Basics video on YouTube a few weeks ago.

Sibilance is another phenomena that generally makes a vocal performance less enjoyable. And by the way, sibilant consonants may sometimes also be referred to as stridents, obstacle fricatives, or obstacle affricates. But I don't think most singers or audio engineers need to memorize all of the different terms, as long as you know what sibilance means.

Basically, sibilance is the presence of certain "hissing" sounds in a singer's vocals. Generally, there are five letter combinations that can start a sound which leads to sibilance: S, Z, SH, CH, and J. Try vocalizing each of those sounds. You can probably hear/feel the hissing quite easily, right? Ok, try each one again for a second time, but slowly, and this time, think about something: the tongue is an incredibly versatile muscle. And a very fast one. When you vocal the S or the Z sound, think about the position that your tongue is in. The front of it is right up against the roof of your mouth, just behind your upper front teeth. It is mostly pressed up against the roof of your mouth with only a very small thin channel for air to flow through, which is why you hear the hissing sound, because the air comes out of that channel quite quickly. For the other three sounds, the SH and CH and J, the tongue is still up against the roof of the mouth, but a wider channel remains clear, which is why the air has more room to flow and the hissing is not quite as pronounced. Incidentally, I find it amazing how quickly a person's tongue moves during regular speech. I think a lot of people fail to appreciate how much work it does in the course of a conversation.


In terms of audio frequency, most sibilance occurs in the range from about 5k to 10k Hz. This is definitely the upper part of the range as far as vocals go. It's also interesting to note that as some people get old, they may suffer partially from a condition called presbycusis. This is basically a type of hearing loss, but it starts in upper frequencies. Basically, if presbycusis becomes advanced enough, the degraded ability to hear upper frequencies may creep down into the part of the spectrum that sibilance occupies, so the sibilance may seem to be less of a problem than it would have when the listener was younger.

Perhaps I shouldn't have titled this post to suggest that singers need to deal with this problem. The audio engineers play a much larger role in properly controlling sibilance in vocals, although it is good for singers to understand the phenomena. The first two things that I need to say about sibilance are that: (1) pop filters, which help deal with plosives, do not help reduce sibilance; and (2) microphone type and placement can make a huge difference.

I won't get into details about microphones here. The subject of microphone types and characteristics is incredibly complex. I want to put together a detailed tutorial video just about microphones, but to be honest, I don't even feel fully qualified to talk about them effectively, so I'll probably bring in an outside pro to help with that topic. But I can tell you a couple of brief points.


First, there are a several different types of microphones: dynamic, condenser, ribbon, crystal, and carbon. But the first two types are most common. Dynamic microphones are cost-effective, general-purpose microphones that are sturdy and robust. They can be used to record vocals, but would also be the type most often used to record various instruments, such as guitars (miking a guitar amp), etc. Condenser microphones are generally a bit higher quality, and are often better at capturing higher frequencies, but the drawbacks are that they are also a bit more fragile and they also need a small external power source (called phantom power) that usually runs to the microphone through the XLR signal cable attaching it to a mixing console. Often, the two types are mixed in recording sessions. For example, most instruments might be recorded with dynamic microphones, the vocalist with condensers, and the drum kit with a mix of several dynamic microphones capturing most of the kit with a couple of condenser mikes suspended overhead to capture a bit of extra high-end sizzle.

Anyway, the point of this background on microphones is not to tell you which one works best to reduce sibilance. The problem is that there is no specific answer to that. Different microphones (types OR models) can work more or less effectively, depending on the vocalist and to a less degree depending on the room. What works well with one vocalist might not be the best answer for the next vocalist.

Another interesting characteristic of microphones is that some of them are "directional." In other words, instead of picking up sounds equally well from all directions, there are certain directions from which sounds are recorded more or less easily. For example, in terms of recording fields, microphones can be classified as omni-directional, bi-directional, cardioid, super-cardioid, and hyper-cardioid. In other words, the microphone can record sounds differently depending on its orientation when it is set up. If you want to learn more about this topic, click here for a good post from DPA Microphones (warning, it's slightly technical).

The distance from the vocalist to the microphone should be greater than one might initially expect when trying to control sibilance. Depending on other factors, it might be common for the vocalist to place their mouth at least twelve inches away from the mike, and perhaps even eighteen inches away. It might also help for the vocalist to be above or below the usual horizontal plane. Of course, the easiest way to accomplish this is to adjust the angle of the microphone, not the singer.

So to sum up, if you're in a recording session and you're hearing the hissing of sibilance, your best options are as follows:
1. Try different microphones.
2. Make sure the vocalist's mouth is an appropriate distance from the microphone.
3. Angle the microphone slightly, according to what seems to work.

Other than that, there isn't a lot that can be done in terms of adjustments to the recording setup. I have occasionally heard people suggest that the vocalist can try chewing some gum and then sticking that gum up against the roof of their mouth. In some cases, this might help slightly, but this probably isn't a preferred approach because it would be annoying for the vocalist. Also, it would need to be a relatively small amount of gum, or else the singer is going to start to sound like they have something in their mouth, and his or her voice will start to sound different.

There is one other tool in the engineer's kit to reduce sibilance, which would occur during the post-recording period, when audio is being edited. There is a dynamic audio processing effect called "de-essing" which can use EQ'ing and compression to essentially reduce the volumes of certain frequencies within the bands in which sibilance is prevalent. Of course, it's always better to try to reduce problems at the recording stage, rather than hoping that a computer can resolve issues. If you want to learn a bit more about de-essing, click here to check out an article from Sound On Sound magazine.

Alright, hopefully this gives you some food for thought during your next recording session. Best of luck in your next project! And of course, if you'd like to check out some audio recording tutorial videos that I've put together on YouTube, click here to see a nicely organized index of the various tutorials that I've put together.


If you'd like to see my of my Understanding Sound tutorials, visit:


-----


I'm Jonathan Clark, known online as DJ Bolivia.  Do you want to learn more about DJ'ing and music production?  If so, visit:


If you happen to enjoy techno tracks, most of my tracks are available as free downloads from this link:


Thanks so much for visit, and for your support!  I really appreciate the fan base that I've been able to build up over the years.

Also, if you want to visit any of my other sites, here are a few links:
    YouTube:  youtube.com/djbolivia
    SoundCloud:  soundcloud.com/djbolivia
    Blogger:  djbolivia.blogspot.com
    Main Site:  www.djbolivia.ca

Tuesday, January 29, 2013

Audio Recording Tutorial #01 - Basic Recording with a HD Camera and a Wave Recorder

I’ve generally been using my DJ Bolivia YouTube channel for educational purposes.   My goal has always been to feature videos teaching about a number of music-related topics:  DJ’ing, using audio editors such as Ableton and Cubase and ProTools and other DAW’s, production of dance music from scratch, and the occasional music video.  But one additional group of videos that I’ve wanted to put together has been a series on basic audio recording techniques.

I just put together the first video in that series.  This one deals with very simple audio recording using the microphone on a HD video camera, and using a portable audio recording device.  It talks about some of the basic types of processing that a studio engineer would put on an audio track (particularly on vocals), which includes reverb, delay, chorus, and EQ’ing, although it only goes into any detail on the last of those four topics.  I predominantly use Audacity to illustrate some basic concepts, with just a bit of use of  Audition and VLC to help out with some other tasks.  Essentially, I’ve recorded a song (acoustic guitar and singing) and then extracted the audio from the recording devices, then I did some very simple processing in order to come up with a better quality audio file.

Here’s the video:


The video touches on quite a few different topics that a musician should become familiar with if you want to do any recording.  Here is a list of some suggested additional reference sites that you might want to check out, in order to learn more about topics that I mentioned:


Audio File Formats:


Software Used:


Recording Devices:


Extracting Audio from Video using VLC:


Audio Frequency Spectrum:


Plosives:


Sibilance:


Pop Filters:


Equalization:


Reverb(eration):


Normalizing Audio:


If you want to download the audio files that I was using in this video, to better hear the audio in your own home studio setup, here’s a link to a zipped folder containing the relevant files and a _readme.txt file which describes the contents:


To see the rest of the tutorials in this Audio Recording series, visit:


Thanks so much for visit, and for your support!  I really appreciate the fan base that I've been able to build up over the years.

Also, if you want to visit any of my other sites, here are a few links:
    YouTube:  youtube.com/djbolivia
    SoundCloud:  soundcloud.com/djbolivia
    Blogger:  djbolivia.blogspot.com
    Main Site:  www.djbolivia.ca

Sunday, September 6, 2009

Separating Vocals from Songs

I've gotten quite a few inquiries from people recently on how to separate or remove vocals from a song, so they can then remix those vocals into a different track. It's very difficult to do, but it IS possible in some cases, so I'll outline a way to make it happen here.


First, in order to do this, you need to find a radio edit of the song that you like, with vocals. Then, you also need to find the exact same version of the song but as an instrumental, ie. without the vocals. If you can't find both of these two versions, then this trick won't be possible.

Next, you need to import the two audio files into your sequencer. Line them up perfectly in parallel, down to the millisecond (actually, to the exact sample). You need to be able to play them simultaneously so that they sound exactly like just one song (except for the vocals standing out, of course).

Now, convert each track to mono, so the two stereo channels are combined in each track. They need to be panned to the center.

Once you've done the above steps, and you know that they are completely synchronized, then take the instrumental track and invert the phase of the entire track.

Now, play the two tracks together, or bounce them to disk. The phase inverted version in the instrumental will cancel out the waveforms of the music in the vocal version, leaving only the vocals behind.

Now if you cannot find the full song as both a vocal take and an instrumental with the same arrangement, then you're almost out of luck. The only rare exception is that if you have just the vocal version, sometimes (in theory) you can pull tiny snippets of the vocals out from the track by cutting it up and following the steps above (for instance if there is a chorus with vocals and another "chorus" chord arrangement in the song without singing). This wouldn't work with rock songs, because they are recorded live and they won't be exactly the same, even if the musicians tried to play them exactly the same. But in today's studio-heavy world, some pop songs which are computer produced are probably generic enough to make it work. I've never actually tried this, but in theory, you might find some songs that you could do it with.


Let's step back for a while and ask why you're separating the vocals from a song. I presume that you're trying to remix a track that you like. Are you doing it because you like that track specifically, and no other? If you're doing this as a project for an artist, they should be able to provide the vocals for you. If you're doing it for yourself, then you face a bigger challenge.

An audio file that contains only vocals and no instruments at all is called an acappella. This term is actually a contraction of two Latin words, "a cappella," which literally means "from the chapel," or figuratively, "from the choir." You can do internet searches for acappella tracks in all kinds of places: Google, torrent sites, and legitimate music sites. The trick is to remember that many people spell the word incorrectly. To search effectively, you should search for "accappella" and "acappella" and "acapella" (this last one is the most common spelling and yields the best results in searches, although some people argue that the one with two P's is more correct). If I had a preference, I'd like to see things spelled correctly. So if you're a producer who is releasing acappellas, let's see if we can change the world together, and start spelling it with two P's.

Personally, rather than bang my head against a wall trying to find vocals for a specific track that I want to remix, I do it this way: I'll spend half an hour on the net, trying to locate an acappella for that particular song. If I can't find one in that amount of time, I'm probably not ever going to find one. Sometimes, it is better to just admit defeat and look instead for acappellas in general, and then pick one that you like which is already available.

There are a lot of acappellas out there. If you search download or torrent sites, you can find lots of legal ones that you can download very quickly. Some have to be purchased, but many are free, depending on which sources you use. Go to www.beatport.com as an example. Enter "acappella" into the search engine, and you'll find several hundred tracks to choose from. Enter "acapella" and you'll find thousands.

In rare cases, if you are looking for a specific song, you can actually contact the artist and ask if you can have a copy of the vocals. Some artists will give these out, although it's pretty rare on major labels unless you happen to be a very well-known remixer with a lot of previous credits on your resume. Many smart studios/artists will recognize the fact that the more often that their songs are remixed, the more publicity (and therefore royalties) that go to the copyright holders for the songs. The remixer doesn't get any royalties (except in certain uncommon exceptions for top remixers). Usually, all the money is made by the original artist (or I should say, more accurately, by the studio). Of course, you do also have to recognize that a bad remix of a track doesn't help much, because it won't get played and therefore won't drive radio-play or other royalties. Some artists/studios will provide vocals under strict conditions that the artist/studio gets to review the remix first before it is allowed to be released, and they have the right to prevent the remixer from releasing the remix if they don't like his/her version of the song.


So anyway, the moral of the story is that if you have your heart set on remixing one specific song, sometimes there are options. But usually, I find it is best to listen to some of the thousands of vocal recordings that are already out there, and choose one of those readily-available tracks to remix.

Good luck with your remixing projects!


---


I'm Jonathan Clark, known online as DJ Bolivia.  Do you want to learn more about DJ'ing and music production?  If so, visit:


If you happen to enjoy techno tracks, most of my tracks are available as free downloads from this link:


Thanks so much for visit, and for your support!  I really appreciate the fan base that I've been able to build up over the years.

Also, if you want to visit any of my other sites, here are a few links:
    YouTube:  youtube.com/djbolivia
    SoundCloud:  soundcloud.com/djbolivia
    Blogger:  djbolivia.blogspot.com
    Main Site:  www.djbolivia.ca